I'm excited to share not only a new project, but also a new paper-piecing pattern: a Glowing Star.
Showing posts with label hand-stitching. Show all posts
21 July 2015
29 July 2013
Patchwork, Revisited
I recently had the chance to do something new, for me, in terms of quilty experience: I got to visit with (and use!) a quilt I made quite a while ago that has since been used and incorporated into daily life. That's the point, right?
25 July 2013
Scrappy Hexie Pillow
Hooray! Another long-term WIP knocked out: some English paper-pieced hexagons.
Over two years ago, I (temporarily) caught the hexie bug-- it looked so simple, and people's inspirational results were so pretty.
I gathered together scraps, basted them to the paper templates during a massive tv binge session, and put them in a ziplock bag. Whenever I needed some hand work, I could pull them out.
17 April 2013
Little Hand-Quilted Pillow Tutorial
There's one little pillow on our couch that I insist is mine, the perfect size for right behind my head while watching junky TV. It's about 12x16 inches, and luxuriously feather-filled. I decided that I needed another, of course, and thought I'd share the process.
With the directions below, you can create fun hand-stitched a pillow out of any special block of your choosing.
Step 1: Pick a favorite 12.5x12.5 inch unfinished block. I used one of my recent Star Seams blocks.
03 May 2012
Bright Windows Baby Quilt & Free Pattern (ish)
Right now, it seems like I have about 16 long-term, complicated projects going on. The kind that I can only work on in little chunks at a time (telling myself, "ok, all you have to do for this one today is press open 50 HST's, and you can put it away").
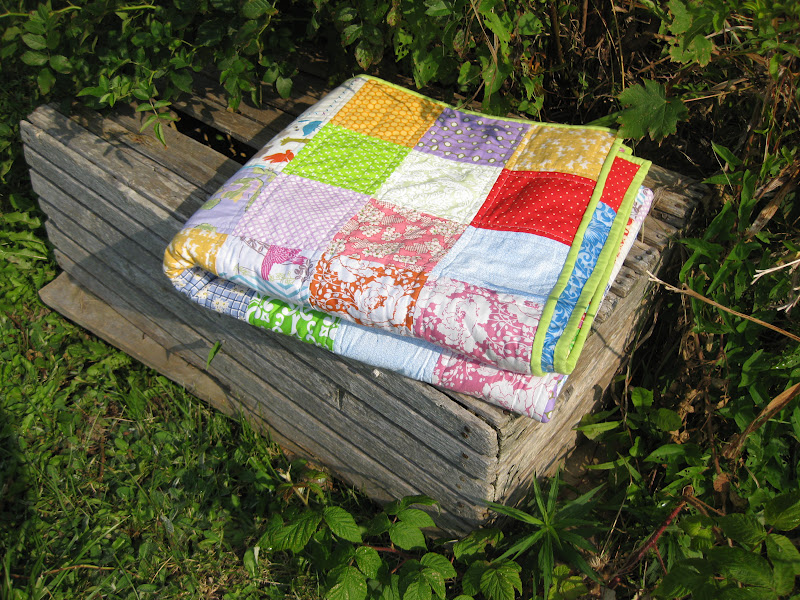
So it's very nice to take a moment and look back at a simple and sweet finish from last summer. Its long quartered rectangles remind me of tall windows, so it's named Bright Windows, and it was very easy and fun to put together!
I sliced up a Valori Wells Del Hi charm pack, and just played around. The fabrics are girly without being sticky-sweet, and I think the palette is really interesting. This quilt, which finishes at around 36"x 48", really lets them shine.
Want to make your own? Here's a loose pattern. I don't have step-by-step photos, but the quilt is so simple that I hope a finished shot will be enough of a guide. Unlike my current endless projects, I completed this quilt top in one weekend morning sewing session!
You'll need:
~(32) 5"x5" charm squares in assorted prints
~1 1/8 yards white (or other) sashing (I used Kona Snow)
~3/8 yard binding fabric
~40" x 52" backing of your choice
~40" x 52" batting (I like Warm and Natural cotton)
Get started!
1. Cutting:
-Slice charm squares in half to make 64 2.5" x 5" rectangles
-Cut white fabric into 8 4.5" x Width of Fabric strips, trim selvages off. (You could probably squeak by with just a yard of white, but since you need exactly 36 inches, I like to play it safe with the few extra inches an eighth provides)
-From 5 of the white WOF 4.5" strips, cut 20 9.5" x 4.5" units. Save extra fabric for another project, or use it for a pieced backing.
(Use a 1/4-inch seam allowance in all sewing steps.)
2. Play around with your half-charm rectangles, pairing them up. Chain piece them together into 32 4.5" x 5" units. Press seams to one side.
3. Play around and pair up again, matching each new, double-rectangle 4.5" x 5" unit with another one, lining up along the shorter 4.5" sides. Arrange so that the seams lay in opposite directions and can nestle together, and join to make 16 4.5" x 9.5" units. Press open, and your "windows" are done!
At this point, refer to the finished quilt for layout visuals. I pieced this quilt in horizontal rows. To make the rows:
4. Pair up each "window" with a 4.5" x 9.5" white sashing unit and join along the long sides.
5. Arrange the resulting 8.5" x 9.5" window+sashing units into 4 rows of 4. For each row, join each window+sashing unit to the next, and add one additional white 4.5" x 9.5" unit to the end of the row. Press seams in one direction, ideally the same direction as the bottom half of the "window" unit.
Rows done!
6. Lay out your (now complete) rows, and sew one of the remaining 4.5" sashing strips to the bottom of each of the first 3 rows. Press seams towards the sashing and trim excess.
7. Join the top two units (both composed of a window row+sashing strip). Press seams towards the sashing.
8. Join the bottom two units (window row+sashing strip and just window row). Press seams towards sashing, creating two halves of the quilt top.
9. Join the two halves together, press seam towards sashing, and your quilt top is complete! Square up your corners (using a 12.5"x12.5" ruler is my favorite way).
10. Finish your quilt with the backing, batting, quilting, and binding of your choice! I used an extra "window", some leftover sashing, and some fun orange butterfly yardage from the line to make a pieced backing.
For binding, I chose a fiery red pindot fabric, which echoed the bright red in some of the prints, and there's a tiny piece of white inserted, too.
I machine-quilted this one in simple straight lines along the windows to make a grid. I also added some nice red hand-stitched details.
This little one has

25 April 2012
XL Improv Quilt
This super-sized improv block quilt, finished last summer, remains one my my favorites, both for its simplicity and for the little extra details that make me smile.
I made this for a friend who told me she liked solids and Gees Bend quilts a lot (who doesn't?), and more subdued colors than I usually work with. I went ahead and created an XL improvised patchwork strip with navy, cream, and a hint of violet. It was so fun to make, and I couldn't resist adding some quirky elements.
I hid some little vintage-y print scraps with tape measures, as well as some hand-stitched details.
It's a relief, sometimes, to work with a constrained palette, and I think solids swing the quilt's focus to shapes and patchworked textures.
It's backed and bound in medium gray, with the exception of tiny bits of bright green and violet that I couldn't resist!
It's quilted in double organic horizontal lines-- close enough to give it some structure, but far enough apart to keep it very soft.
I'm really interested in continuing to make quilts with this blown-up quality: taking a quilt block concept and making it extra-large. Like this one, too. Hm.
Sometimes, even if you're feeling a little bit too grown-up, you can still just wrap yourself in a quilt.
This quilt was also featured on Modern Day Quilts, an amazing eye candy collection that never fails to inspire!

12 April 2012
XL Ikat: A "Modern" Red and White Quilt
Just over a year ago, I was lucky enough to visit Infinite Variety: Three Centuries of Red and White Quilts, an exhibition put together by the American Folk Art Museum. (Follow the link to check it out!)
Basically, this one lady's 3 zillion red and white quilts were on display in a huge, hangar-like armory. I was just... overcome. Not just by all the amaaazzzzing quilts, but also because of the sheer quantity of human creativity hours put into making them all.
At one point, I almost started crying when I saw this quilting:
![]() |
(sorry for the cell phone picture) |
I was empowered: orange peels and curves (and hand-quilting) are hard. Whoever this lady was, she just went for it.
I was also struck with how very "modern" these pieces were, despite being quite old, in many cases.
To me, these quilts were also standing in for all the women behind their creation. Maybe they were sewing for fun, maybe by necessity, but each quilt shows serious craftsmanship and love. And, through this effort, we're connected, those ladies and me.
Later that year, a friend of mine requested a custom quilt, inspired by her own visit to the exhibit. Win-win! She drafted up a cool idea, with a sort-of Native-American, XL ikat spot center, and I translated that into a quilt.
I realized that I had made twice as many flying geese as I needed (using the second method here makes a lot, pretty easily), so I put 'em in the back.
As a very tangible connection to all those red and white quilts of the past, I was so excited to make this one!

26 March 2012
Feature Quilt
When I saw this quilt at Film in the Fridge, I knew just what to do with some of the gorgeous hand-printed linen scraps my friend Lynn of South Street Linen gave me to play with!
Along with the linen scraps, I used white, ash, cream, and Kona Tangerine in simple borders radiating off the corner square. The widths of each layer were sort of randomly chosen and improvised as I went along. I love how it turned out-- using all solids is a great way to spotlight some really special fabric.
Lynn is an amazing artist, and making some of the softest, prettiest linens (scarves, table linens, and more!) you can imagine.
I quilted it in straight lines echoing the corner square, and then in L's, varying the density of the straight lines as fabrics changed.
I pieced a sweet little improv block for the back out of leftover scraps. I love putting a surprise back there!
It's bound in medium gray, and I gave it some lovely tangerine x details in a corner. Yum!

10 March 2012
Take a Rest
Whew.
I'm a sucker for certain animal textiles.
This Echino Chelsea by Etsuko Furuya lion in the garden print stole my heart.
"Look at me!" it called, "I've got your kind of colors, admit it.
Check out these flowers. Is that a bird? Orange bushes? Pink bugs!"
As I tried to walk away, it asked, "How handsome is my Lion?"
Done deal.
Had to make some pillows! These big ones are 18x18 inches.
I balanced out the Echino's bright bright brightness with some Kona Stone, and some ecru machine and hand-stitching. They've all got a layer of cotton batting underneath for structure and extra cushion.
I also learned how to put an invisible zipper in a pillow! Not that hard!
Using Elizabeth Hartman's mod mosaic method, I switched up typical values to make a smaller 12x16 inch companion pillow for those lions. Instead of using colorful scraps with white "tile grout" sashing, I used pieces of Kona Snow with turquoise sashing (I think it's Aqua from Connecting Threads and totally on sale right now).
They're all backed in the same: some kind of linen/cotton/miscellaneous natural fiber upholstery-weight fabric. Quite sturdy and earthy.
Cotton double gauze + pillows = softest place to rest.

04 March 2012
Modern Mini Challenge Quilt: Spider Legs
When I saw that Jennifer at Ellison Lane Quilts was organizing a mini quilt challenge, I thought it would be the perfect opportunity to work out an idea I had to make an improv chevron ring. This is a really fun challenge, and there is a TON of inspiring work over there!
I'm all about a scrappy and bright look these days (fighting the late winter gray)! It's made with some favorite scraps, Kona Snow, and Free Spirit Nugray. I bound it with my favorite DS Quilts print, and love what the variation adds. I also snuck the DS Quilts dots in there :)
I'm not sure that this turned out like a real "chevron" ring. It looks more like spider legs to me! It's ok, sometimes creepy works.
I did some random machine quilting in the ring, like a crazy star, and added some hand-stitched pink circles, too. The mini is only 12x12 inches, so it's the perfect canvas for this kind of detailed work.
I'm going to hang it in my sewing space! While I've made plenty of pillows and other small quilted projects, this is my first official mini quilt, and I think this challenge was the perfect thing to get me started.
It won't be my last.

24 February 2012
A Lucky Shot
This past summer, I finished up binding a quilt up in Maine. The perfect spot to take some photos! My quilt photos were (and still are) a bit hit or miss. I was never really interested in photography until I wanted to document my sewing. It seemed too fiddly: too much setup, too much technical info, too much hassle. I've been working on it, bit by bit.
Like people's lives on Facebook, my quilt photos are selected and edited to only show the best. (Um, of course they are.)
With this quilt, I somehow struck photo gold. Beautiful day, beautiful setting, interesting rusty chair, and the blessed "auto" setting on my camera.
I made this simple patchwork quilt from a stack of bright prints cut into 5-inch squares. Sometimes you just have to go patchwork.
I like how it's bright and soft at the same time. At one point, I decided it needed more red for contrast.
I had some "creative assistance" along the way.
I stright-line quilted this one in a double-line grid, with quilting lines about 1/4 inch away from the seams. Simple, but pretty dense. This is a nice, heavy quilt.
And there was intensive "product testing."
I had added quite a few squares of white (Kona Snow, I think) into the mix. Once the quilt was completely pieced and quilted, they looked too empty to me.
I decided to embellish each one with a bit of hand-stitching and embroidery. I wish I had taken more photos, but each square had its own stitch combo. It was really fun to think up new designs for each one.
Measuring about 60x70 inches, the quilt is backed in a bold Jennifer Paganelli bright blue damask stripe, with a line of leftover patchwork scraps pieced in on one edge.
I bound it in a pretty spring green solid. (Sprout from Connecting Threads)
Of course, not all of the photos were gems. Over time, I've become much more conscious of what makes me like/dislike photos, and how to pick out the good and the bad. Here are a few "misses":
*sigh* missing summer!
Like people's lives on Facebook, my quilt photos are selected and edited to only show the best. (Um, of course they are.)
With this quilt, I somehow struck photo gold. Beautiful day, beautiful setting, interesting rusty chair, and the blessed "auto" setting on my camera.
I made this simple patchwork quilt from a stack of bright prints cut into 5-inch squares. Sometimes you just have to go patchwork.
I like how it's bright and soft at the same time. At one point, I decided it needed more red for contrast.
I had some "creative assistance" along the way.
I stright-line quilted this one in a double-line grid, with quilting lines about 1/4 inch away from the seams. Simple, but pretty dense. This is a nice, heavy quilt.
And there was intensive "product testing."
I had added quite a few squares of white (Kona Snow, I think) into the mix. Once the quilt was completely pieced and quilted, they looked too empty to me.
I decided to embellish each one with a bit of hand-stitching and embroidery. I wish I had taken more photos, but each square had its own stitch combo. It was really fun to think up new designs for each one.
I bound it in a pretty spring green solid. (Sprout from Connecting Threads)
Of course, not all of the photos were gems. Over time, I've become much more conscious of what makes me like/dislike photos, and how to pick out the good and the bad. Here are a few "misses":
ugh, feet! shadow! |
Want to see the quilt, or shrubbery? Certainly not my pedicure. |
all washed out! |

Subscribe to:
Posts (Atom)